 |
 As we all know, the ultimate goal of chess is to deliver a checkmate. Fortunately not all checkmates in chess are as complicated as the one discussed here. Today we’ll focus on 13 most common checkmates in chess. You should always look to setup one while playing a game and also be aware of these structures in order to avoid nasty surprises prepared by your opponents. As we all know, the ultimate goal of chess is to deliver a checkmate. Fortunately not all checkmates in chess are as complicated as the one discussed here. Today we’ll focus on 13 most common checkmates in chess. You should always look to setup one while playing a game and also be aware of these structures in order to avoid nasty surprises prepared by your opponents.
By looking at this positions you will learn basic checkmating patterns and will train your ming to create and find similar position in your own games.
White to move in each position.
Two major pieces back rank mate
This is by far the simplest possible mate in the game of chess, which usually occurs in the late stages of the game (i. e. endgame). Stronger side cuts the opponents King from 7th rank with one major piece and delivers a mate with the other one. One the diagram above white mates with 1.Ra8#. This mate is very common and thus important to know and to be aware of.
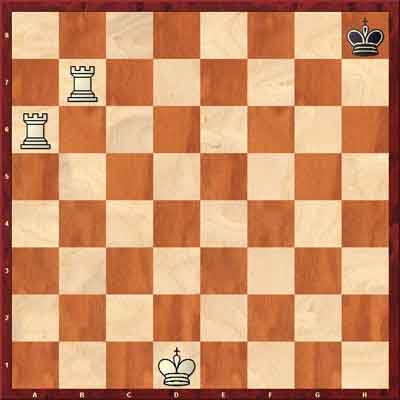
Note: If the opponent’s king is stuck in the middle of the board, the stronger side should “walk” him onto the 8th rank to the shown position by given interchangeable checks with the rooks, and then mating on the back rank.
Two Pawn checkmate
This is a very common endgame, where one side has two pawns and the other side has none. On the positions above, Black has nowhere to move: d7 and f7 are guarded by the White’s King; d8 and f8 are guarded by the e7 pawn which obviously cannot be captured.
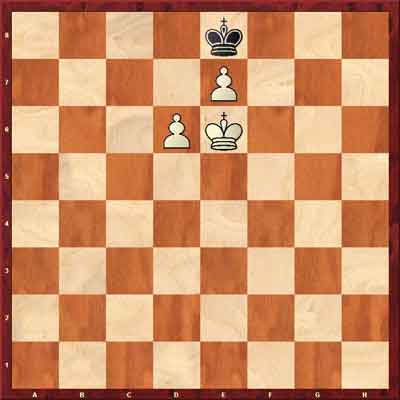
If it were Black to move, White would feel silly since it is a stalemate – a draw. However in this case it is White to move and mate in one: 1.d7#.
This mate is also often occurs in more complex positions with other pawns and pieces present on the board.
Back rank checkmate
This is a classical example of the back rank checkmate which is a very powerful weapon which is used by all players as a serious weapon or a threat. In the position above Black’s King is blocked by his own pawns on the 8th rank (i. e. back rank) and any check by a major piece on the back rank would turn out deadly.
If we take a look at the White’s pawn structure it is pretty similar to the Black’s with one big exception: h – pawn is advanced fromh2 to h3 freeing and escape square or an escape window on h2, illuminating back rank checkmate threat.
White continues with 1. Ra8# delivering checkmate in one.
Note: You should be always aware of the back rank threats even when no immediate checkmate is available, position can change very rapidly and therefore it is a good practice to create an escape window in the endgame where major pieces are present.
Tip: There are a lot of cases of the back rank mate in the Middle game also.
Diagonal checkmate
The setup Queen + Bishop lined up on the same diagonal was proven to be very powerful. In this case the setup is even more powerful since black dominates the so-called long (a1-h8) diagonal.

White mates with 1.Qxg7#. The diagonal checkmate should be in arsenal of every practical chess player. At the same time players should be aware of this kind of setup when on defensive side.
Note: Similar type of mate is possible if White’s Queen and Bishop are lined up on b1-h7 diagonal, double attacking the weak h7square which is often guarded by the King alone.
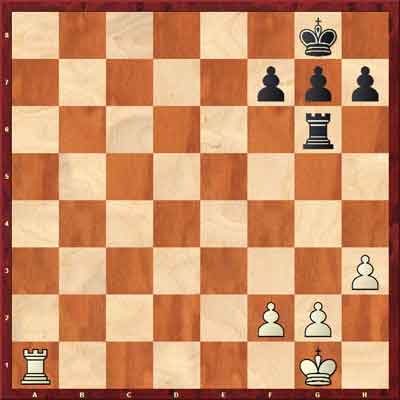
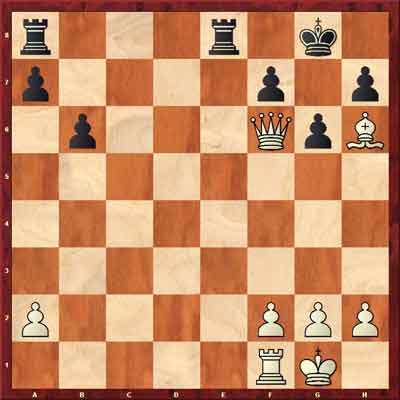
Smothered checkmate
It is a mate given by the knight alone when an opponent’s king is unable to move because it’s blocked by its own pieces or pawns. This mate is quite hard to see sometimes because players usually don’t expect the knight to be a mating piece.
In the diagram above the Black’s King is tightly surrounded by its own pawns and the rook. In fact, Black’s King cannot move at all! Any check delivered to White would be a checkmate. The knight is a perfect piece for doing that since it can check without changing Black’s pawn structure.
White checkmates with 1.Nf7#.
Note: When you see that your opponent’s King cannot move due to surrounding pieces, smothered mate theme should click in your mind.
Bishop and Knight fianchetto checkmate
It is a common checkmate which exploits the 3 weak dark squares around the Black King’s castle: f6, g7 and h6 can be occupied by the White’s pieces.
It is always dangerous to exchange the fianchetto bishop, which would be the Black’s dark square bishop (not present on this diagram below), it will create many weak squares, especially if your opponent has dark square Bishop. Do not exchange the bishop if there is no extreme necessity of doing so.
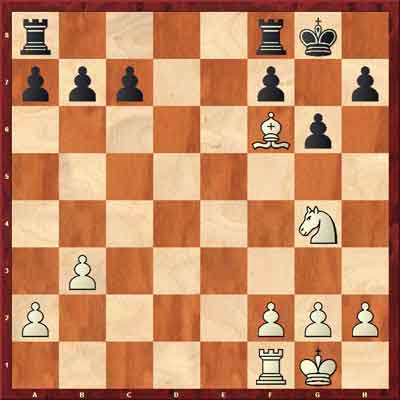
White mates with 1.Nh6#, since Black’s King already couldn’t move due to White bishop controlling h8 and g7 and f8 is blocked by Black’s own rook.
Note: You should always feel danger when you don’t have fianchetto bishop but your opponent does. Alternatively, if you have the bishop and your opponent has a weak fianchetto you should look for opportunities to attack.
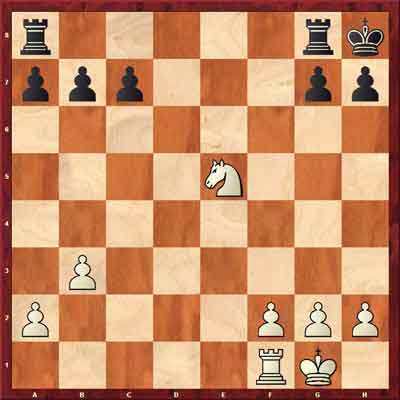
Anastasia’s checkmate
This checkmate is another great example of how the knight can be used in mating schemes. In Anastasia’s mate knight and rook work together to lock an opponent’s King on the h – file (it works as well on a - file too, in case of a long side castle) and to checkmate thereafter.
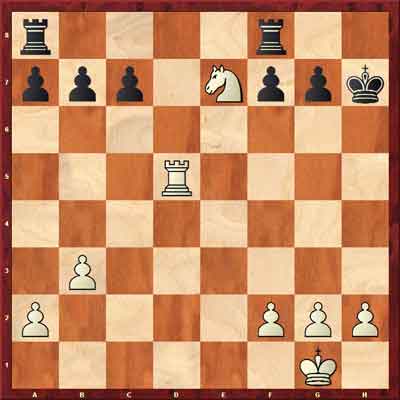
The knight controls g6 and g8 squares, while rook will take care of entire h-file and deliver a checkmate:
1. Rh5#.
Note: The Anastasia’s mate shows an importance of a rook lift in the middle game, which is a technique when one player lifts his rook from the back rank to an active position, usually close to an opponent’s King.
Two bishop checkmate
It was once said that a pair of bishops on an open position is twice as strong as these bishops far away from each other. Doubling the bishops is like doubling rooks – a very effective tool. On the diagram above pair of bishops show its true power by checkmating the Black’s King without the own King’s support: 1.Bb2#.
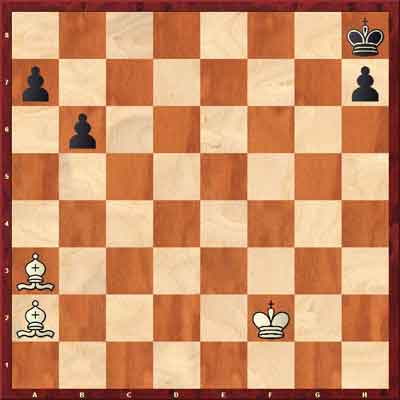
Interesting Fact: Two bishops when working at its best cover 28 squares. Queen can do the same: also 28 squares.
Queen and Bishop pin checkmate
Queen works great in pair with a bishop. In the example above the g7 pawn could not capture the Bishop on h7 since its pinned to the King by White’s Queen. That is a very common and useful mating pattern which should be recognized and used frequently.
White proceeds with 1. Qxg7#, mating in one.
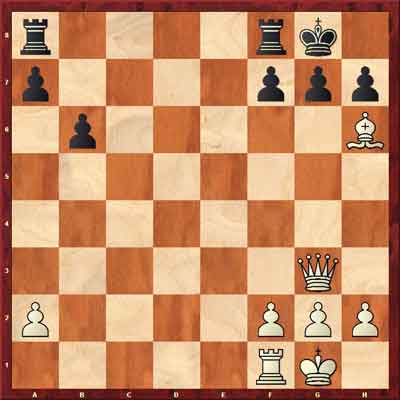
Queen and Bishop fianchetto checkmate
That is another example of how “bishopless” fianchetto can be exploited. White’s sees it and smartly sets up the mating net. Squares h6, f6 and g7 are very weak and White takes advantage of that fact.
White checkmates with 1.Qg7#. Now you know what to do when dealing with weak, “bishopless“ fianchetto.
Note: Once again, think twice before exchanging that fianchetto bishop!
Queen and Rook checkmate
We already know that queen and bishop work great together. In this example we will see that queen and rook work as well or even better in pair. Black has his King’s side castle setup, but the h-pawn is missing, making it a very unsafe place for the King to be at.
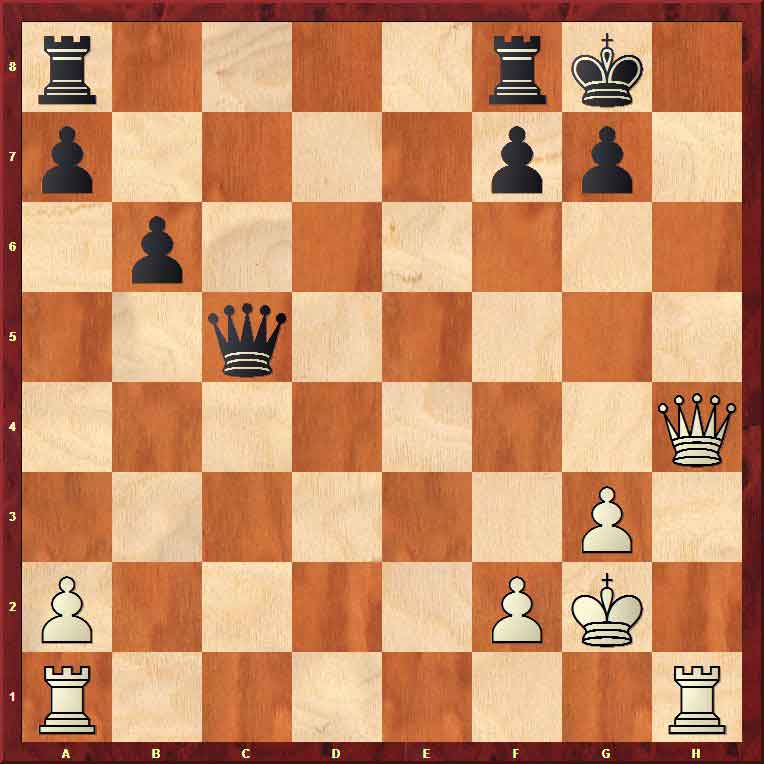
Once again White just exploits weak squares in order to develop a checkmate: 1. Qh8# or 1.Qh7#.
Note: When you have an open file available it is a must to occupy it with major pieces, double up and attack!
Queen and King checkmate
It is a very simple yet useful mate which almost always occurs in the endgames. It is very easy to checkmate a lone King with a King and Queen working together. You need to setup position similar to the one on the diagram and declare a mate: 1. Qh7# or1.Qg7#. Else you can play 1.Qa8# or even 1.Qb8#.
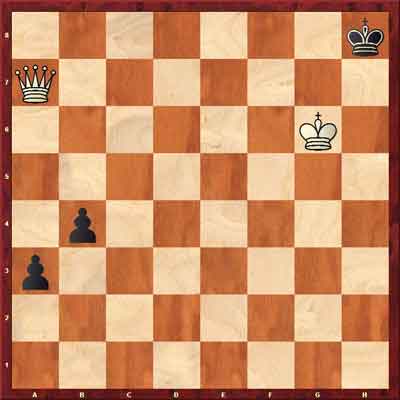
Note: Most players would probably resign before that positions occur, but there are some players who will play till the very end. You must now how to win this simple positions quickly and effortlessly, even if short on time.
Rook and Bishop checkmate
This is a very common checkmating theme not only in the endgame, but in the middle game as well. The basic idea is that the Rook is used to cut the Black’s King on the edge of the board and use Bishop’s long range abilities to deliver a mate.
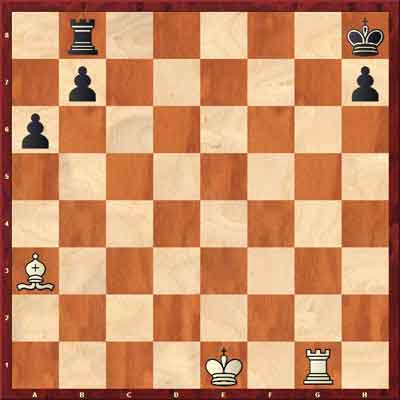
White continues with 1.Bb2# and checkmates.
Note: This mate is also known and Morphy’s Mate since it was first employed by Morphy in one of his games.
|
No comments:
Post a Comment